Hiring Center
Use your screen reader commands to navigate the elements on the page such as headings and links.
Overview
The CAPPS Hiring Center is designed to enable you to create requisitions, send them for approval, and post them so that interested applicants can apply. Once applicants are attached to a requisition, you are able to track hiring activities, manage interviews, change the status of an applicant’s application, and create summary reports about applicants and your associated requisitions.
Step Actions
The step actions for completing a transaction are presented in two ways: Text Only and Screen Samples:
- Text Only provides instructions for completing the transaction in order from beginning to end. It does not include screen samples.
- Screen Samples include detailed screen shots to help complete the transaction.
Transactions Covered in this User Guide
- Hiring Center Home – Navigating to the Hiring Center Home page.
- Global Navigation Bar – Using the Global Navigation bar to use the tabs of the Hiring Center including the Search feature.
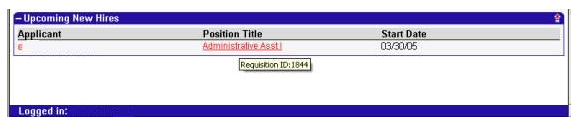
- Workbench – Viewing a Requisition Profile, Viewing Requisitions I Need to Approve, Viewing Requisitions Awaiting Approval, Viewing Upcoming Hew Hires.
- Create a New Requisition – Completing a new requisition profile.
- Reviewing Applicants – Completing applicant activities.
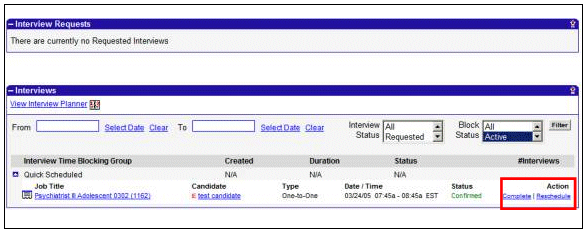
- Interviews – Completing Interview Activities.
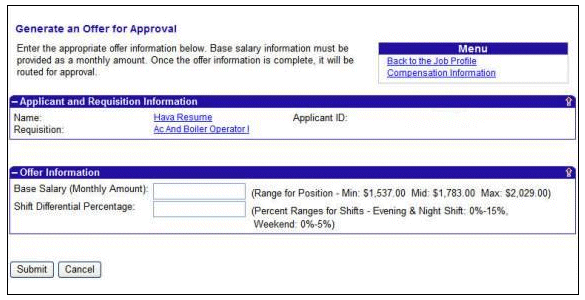
- Offers – Completing the Offer Workflow Process.
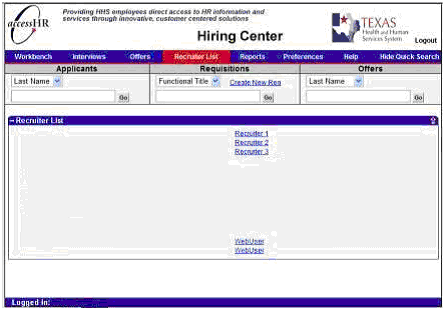
- Recruiter List – Viewing the Recruiter List.
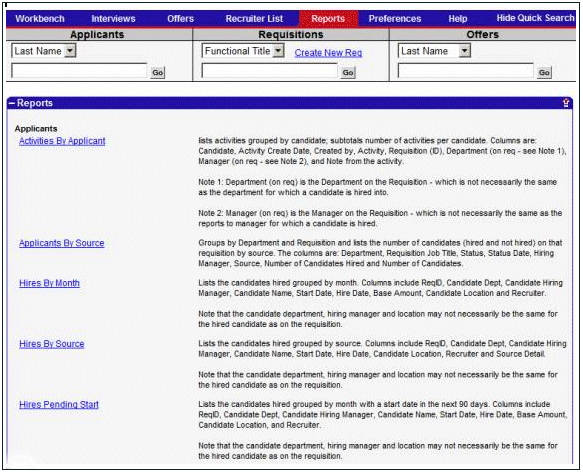
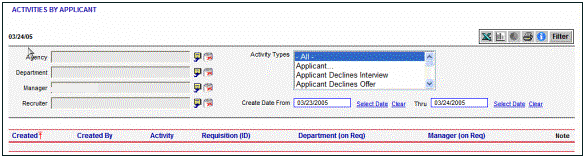
- Reports – Using the Hiring Center Reports.
- Help – Accessing the Hiring Center Help tab.
- Key Things to Remember – Contact information and a summary of important things to help you with Hiring Center activities.
Key Terms
For a complete glossary of terms, click here: CAPPS Glossary
- Requisition � A form utilized to initiate the recruiting process for staff positions.
- Requisition Profile � A completed, approved requisition is called a requisition profile.
- Requisition Type: Perpetual � A requisition identified as Perpetual has a posting duration of 182 days (6 months).
- Requisition Type: Regular � A requisition identified as Regular has a posting duration of 10 days.
- Workbench � The Workbench provides an overview of requisitions at various stages of completion.
_ Hiring Center Home
Accessibility Instructions
Use your screen reader commands to navigate the elements on the page such as headings and links.
Introduction
From the CAPPS Home page, you can access the Hiring Center several different ways. One path to access the Hiring Center is through the links in the CAPPS Menu left navigation. Select the Manager Self-Service menu. Upon selection, the left navigation expands. Select the Recruiting folder to see the Hiring Center link.
Step Actions
The step actions for completing a transaction are presented in two ways: Text Only and Screen Samples:
- Text Only provides instructions for completing the transaction in order from beginning to end. It does not include screen samples.
- Screen Samples include detailed screen shots to help complete the transaction.
Key Terms
For help with terms used in this User Guide, go to the top of the page. Top of Page
Text Only Step Actions for Accessing the Hiring Center
Follow the steps below to access the Hiring Center.
Steps
Select Manager Self-Service. Upon selection, the left navigation expands to reveal the Hiring Center highlighted under the Recruiting folder. Select Hiring Center to access the Hiring Center.
From the I want to�section of the Portal Home page, select the Access the Hiring Center link under Manager Links.
Accessing the Hiring Center
Follow the steps below to access the Hiring Center.
Steps
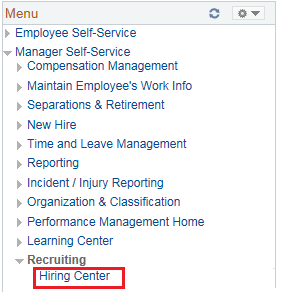
Select Manager Self-Service. Upon selection, the left navigation expands to reveal the Hiring Center highlighted under the Recruiting folder. Select Hiring Center to access the Hiring Center.

From the I want to�section of the Portal Home page, select the Access the Hiring Center link under Manager Links.
_ Global Navigation Bar
Accessibility Instructions
Use your screen reader commands to navigate the elements on the page such as headings and links.
Introduction
You navigate in the Hiring Center by using the Global Navigation Bar. The Global Navigation Bar is located at the top of the Hiring Center home page. The section you are working on is always highlighted in red on the Global Navigation Bar so you can easily determine your location within the Hiring Center.
Step Actions
The step actions for completing a transaction are presented in two ways: Text Only and Screen Samples:
- Text Only provides instructions for completing the transaction in order from beginning to end. It does not include screen samples.
- Screen Samples include detailed screen shots to help complete the transaction.
Key Terms
For help with terms used in this User Guide, go to the top of the page. Top of Page
Text Only Step Actions for Conducting a Quick Search
Follow the steps below to conduct a quick search.
Steps
Make sure the Quick Search bar is showing by clicking the Show Quick Search tab on the Global Navigation bar.
Helpful Hint: To expand your search, use partial spelling by entering the percent sign (%) in the Quick Search input box. The percent sign (%) is called a Wild Card. An example: Jo% in the Quick Search input box returns last names like John, Johnson, Jong, etc.
Conducting a Quick Search
Follow the steps below to conduct a quick search.
Steps

Make sure the Quick Search bar is showing by clicking the Show Quick Search tab on the Global Navigation bar.

Conduct a search by first selecting the desired search criteria from the drop-down menu. Then enter corresponding text in the appropriate field and click the Go button.
Helpful Hint: To expand your search, use partial spelling by entering the percent sign (%) in the Quick Search input box. The percent sign (%) is called a Wild Card. An example: Jo% in the Quick Search input box returns last names like John, Johnson, Jong, etc.
_ Workbench
Accessibility Instructions
Use your screen reader commands to navigate the elements on the page such as headings and links.
Introduction
The Workbench page provides you with a summary of activities to which you are associated. You can also view and approve requisition and applicant activity from the Workbench page. Sections displayed on the Workbench page include:
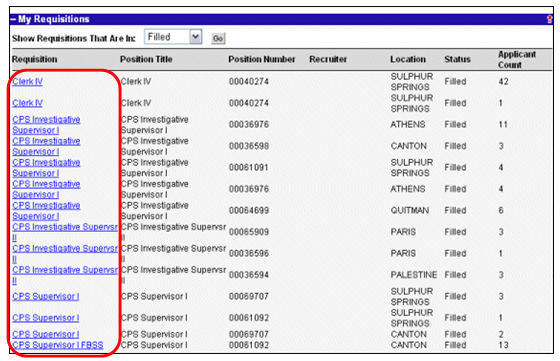
- My Requisitions � This section allows you to view and access your requisitions. While the Hiring Center Workbench will default to show requisitions created within the last 30 days, you will also have the option to view records created within the last 60 days or all records regardless of create date.
- Requisitions I Need To Approve � This section allows you to view and access requisitions that need your approval. While the Hiring Center Workbench will default to show requisitions created within the last 30 days, you will also have the option to view records created within the last 60 days or all records regardless of create date.
Step Actions
The step actions for completing a transaction are presented in two ways: Text Only and Screen Samples:
- Text Only provides instructions for completing the transaction in order from beginning to end. It does not include screen samples.
- Screen Samples include detailed screen shots to help complete the transaction.
Key Terms
For help with terms used in this User Guide, go to the top of the page. Top of Page
Text Only Step Actions for Viewing a Requisition Profile
Follow the steps below to view a Requisition Profile.
Steps
Open a requisition profile in a new browser window by right clicking a Requisition Title and selecting Open in a New Window. The requisition profile opens in a new browser window. Doing this gives you the ability to simultaneously work on a requisition and view other information in the Hiring Center.
Helpful Hints:
- You can filter your requisitions by Draft Status, Open Status, and Closed Status or a combination of the three. Please note, only those requisitions in the selected date parameter will be filtered.
- Select the appropriate status to include in your results by clicking the check boxes that are next to Draft Status, Open Status, and Closed Status. If you select all three check boxes, all your requisitions are displayed. To view a requisition profile, select Requisition Title in the Requisition column.
Viewing a Requisition Profile
Follow the steps below to view a Requisition Profile.
Steps
Open a requisition profile in a new browser window by right clicking a Requisition Title and selecting Open in a New Window. The requisition profile opens in a new browser window. Doing this gives you the ability to simultaneously work on a requisition and view other information in the Hiring Center.
Helpful Hints:
- You can filter your requisitions by Draft Status, Open Status, and Closed Status or a combination of the three. Please note, only those requisitions in the selected date parameter will be filtered.
- Select the appropriate status to include in your results by clicking the check boxes that are next to Draft Status, Open Status, and Closed Status. If you select all three check boxes, all your requisitions are displayed. To view a requisition profile, select Requisition Title in the Requisition column.
Text Only Step Actions for Requisitions I Need to Approve
Follow the steps below to view Requisitions I Need To Approve section.
Steps
You can review a requisition by selecting the Requisition Title under the Requisition column. Once you have reviewed a requisition, you can choose to approve or not approve the requisition by selecting Approve or Not Approved under the Action column. If you click Approve, the hiring manager is notified. If you click Not Approved, the hiring manager is notified on the Workbench in the Requisitions Awaiting Approval section that the requisition was not approved.
Helpful Hint: You have the option to email your recruiter any questions that you may have by selecting Email. If you select Email, your default email application opens and a new email with the To field completed appears.
Requisitions I Need to Approve
Follow the steps below to view the Requisitions I Need To Approve section.
Steps

You can review a requisition by selecting the Requisition Title under the Requisition column. Once you have reviewed a requisition, you can choose to approve or not approve the requisition by selecting Approve or Not Approved under the Action column. If you click Approve, the hiring manager is notified. If you click Not Approved, the hiring manager is notified on the Workbench in the Requisitions Awaiting Approval section that the requisition was not approved.
Helpful Hint: You have the option to email your recruiter any questions that you may have by selecting Email. If you select Email, your default email application opens and a new email with the To field completed appears.
Text Only Step Actions for Viewing Requisitions Awaiting Approval
Follow the steps below to view the Requisitions Awaiting Approval section.
Steps
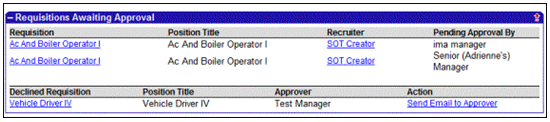
If any of your requisitions are not approved, you can view them in the Declined Requisition section along with the name of the second level manager that did not approve them.
Helpful Hint: You have the option to send an email to the Approver who disapproved your requisition by selecting Send Email to Approver. If you select Send Email to Approver, your default email application opens and a new email with the To field completed appears.
Viewing Requisitions Awaiting Approval
Follow the steps below to view the Requisitions Awaiting Approval section.
Steps
If any of your requisitions are not approved, you can view them in the Declined Requisition section along with the name of the second level manager that did not approve them.
Helpful Hint: You have the option to send an email to the Approver who disapproved your requisition by selecting Send Email to Approver. If you select Send Email to Approver, your default email application opens and a new email with the To field completed appears.
_ New Requisitions
Accessibility Instructions
Use your screen reader commands to navigate the elements on the page such as headings and links.
Introduction
To create a new requisition, you must have your Quick Search Bar displayed under your Global Navigation Bar. If you have clicked the Hide Quick Search, you must click Show Quick Search on your Global Navigation to display the Quick Search Bar. Once displayed, the Quick Search Bar is viewable at the top of all pages in the Hiring Center.
To initiate the requisition, select Create New Req in the Requisitions Quick Search Box.
The Requisition form includes the following sections:
- Basic Information
- Posting Information
- Other Information
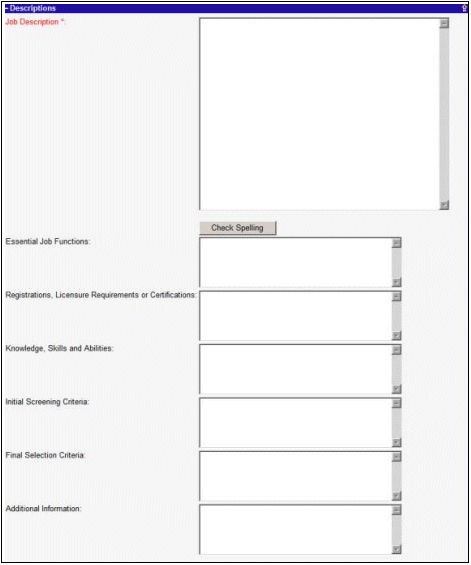
- Descriptions
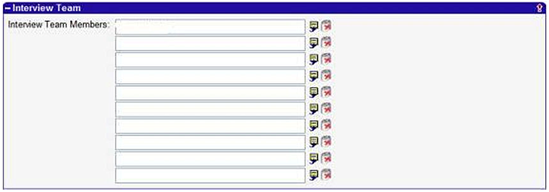
- Interview Team
- Recommended Compensation
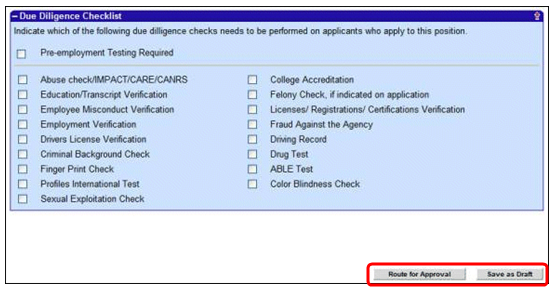
- Due Diligence Checklist
Step Actions
The step actions for completing a transaction are presented in two ways: Text Only and Screen Samples:
- Text Only provides instructions for completing the transaction in order from beginning to end. It does not include screen samples.
- Screen Samples include detailed screen shots to help complete the transaction.
Key Terms
Text Only Step Actions for Creating a New Requisition
Follow the steps below to create a new requisition.
Steps
Open the Quick Search bar and select the Create new Req link. Once the requisition form is open, you click on the Data Selector icon next to the Position Title field to search for positions by Agency, Position Title or Position Number.
Helpful Hints:
- It is recommended that you search by the agency and position number rather than only the position title. Searching by the agency and position number limits the search results that are displayed, making it faster for you to find the position for which you are looking. Also, many positions have the same title so the position number is used to distinguish a position.
- Please note that the agency defaults to your agency. If you select another agency from the drop-down list, remember to click Search to bring up the correct search results.
- Position Title
- Functional Title (The functional title is the title that external applicants see when they view a posting. You have the option to edit the functional title so that it is more appropriate for an external applicant.)
- Position Number
- Job Code
- Salary Group
- EEO Code
- FLSA Status
- Full/ Part Time
- Regular/ Temporary
- Agency
- Department
- Location
- The following fields default based on the position selection in the Posting tab:
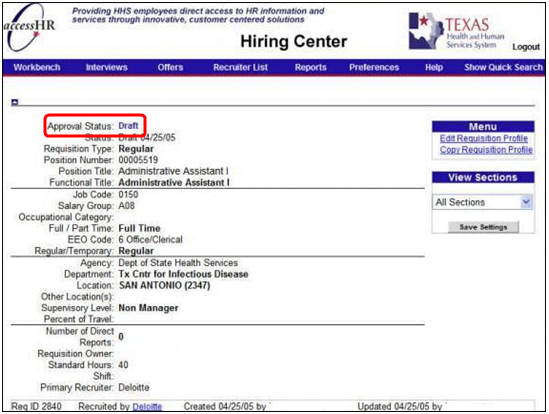
- Status - Defaults to Draft when creating a new requisition
- Requisition Type
- Posting Duration
- Requisition Owner - Defaults to the manager creating the requisition
- # of Openings - Defaults to 1
Helpful Hint: If the position does not qualify for telecommuting, leave the Telecommuting Status field value as Select One.
- You can cut and paste information from job descriptions you have on your computer into this section. The job description that you enter in the Job Description field is displayed on the job posting and is viewable to all applicants.
- Please remember to check the spelling on the Job Description as it will display to all applicants
- Position Title
- Functional Title
- Supervisory Level
- Requisition Owner
- Job Description
- Posting Salary From -To
Helpful Hints:
- Notice that the requisition is now called a Profile. Once the requisition is either routed for approval or saved as a draft, it is no longer called a Requisition but a Profile. You have the option to copy and/or edit the profile on this page. If you would like to copy a profile to create a new requisition, select Copy Profile from the right Menu navigation bar. If you would like to edit your profile, select Edit Profile from the right Menu navigation bar. You can still edit the requisition while it is in Draft status.
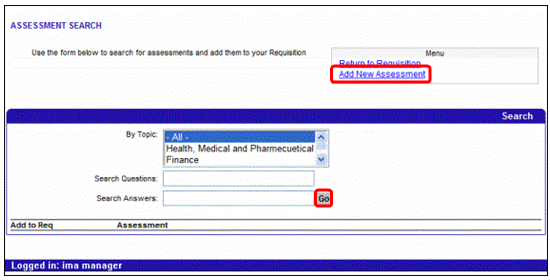
- You have the ability to choose assessment questions and interview questions to associate with the requisition. You can add an assessment or interview questions to a draft requisition. You cannot add interview questions to requisitions that have been approved.
- Please note that at this point, the requisition appears in Draft status on the My Requisitions section on the Workbench.
Helpful Hint: If you select Clone this Assessment, you can include additional questions that can help you sort your applicants. For example, for an Administrative Assistant position you may feel that it is critical that the applicant know how to use Microsoft Word. You can select Add a Question to this Assessment to add the question “Do you have experience using Microsoft Word?” You can also weight the question. By weighting the question, applicants who respond “Yes” to the question (if Yes is the correct response) will be sorted to the top of the applicant list. Questions that are more important should receive a higher weight.
Helpful Hint: These questions are used to sort the applicants. Applicants are sorted based on the question weight that you assign to each question. If your requisition is for a hard to fill position, it is recommended that you do not add an assessment and review all the applicants.
Helpful Hint: The CAPPS Service Center defaults into the Recruiter field as your level one approver and the Reports To field defaults to your manager. You may also choose an additional approver.
Helpful Hints:
- Notice that the requisition is now called a Profile. Once the requisition is either routed for approval or saved as a draft, it is no longer called a Requisition but a Profile. You are no longer able to edit the requisition profile once you have routed the requisition for approval, however, you do have the option to copy the Profile by selecting Copy Profile from the right Menu navigation bar.
- Notice that once the requisition is routed for approval, it appears on the Workbench page under the Requisitions Awaiting Approval section. The requisition details display the requisition, the CAPPS Service Center Specialist associated with the requisition, and which approver is currently reviewing the requisition.
- Once you have routed the requisition for approval, the Staffing Specialist contacts you to review your requisition form.
Creating a New Requisition
Follow the steps below to create a new requisition.
Steps

Open the Quick Search bar and select the Create new Req link. Once the requisition form is open, you click on the Data Selector icon next to the Position Title field to search for positions by Agency, Position Title or Position Number.
Helpful Hints:
- It is recommended that you search by the agency and position number rather than only the position title. Searching by the agency and position number limits the search results that are displayed, making it faster for you to find the position for which you are looking. Also, many positions have the same title so the position number is used to distinguish a position.
- Please note that the agency defaults to your agency. If you select another agency from the drop-down list, remember to click Search to bring up the correct search results.
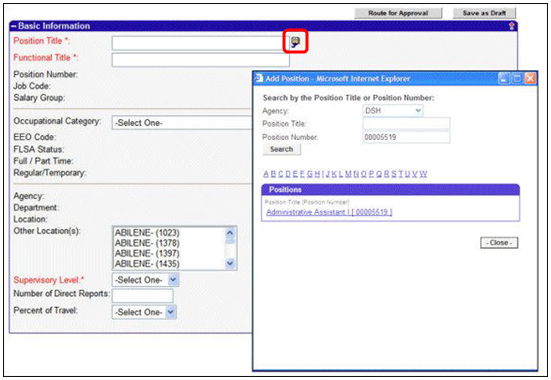
Once you select a position title (e.g. Administrative Assistant 00005519), certain information pre-populates from the position selected. The following fields default based on the position selection in the Basic Information tab:
- Position Title
- Functional Title (The functional title is the title that external applicants see when they view a posting. You have the option to edit the functional title so that it is more appropriate for an external applicant.)
- Position Number
- Job Code
- Salary Group
- EEO Code
- FLSA Status
- Full/ Part Time
- Regular/ Temporary
- Agency
- Department
- Location
- The Agency field also defaults based on your agency specific information. Notice that you cannot edit any fields that are in bold on the screen.
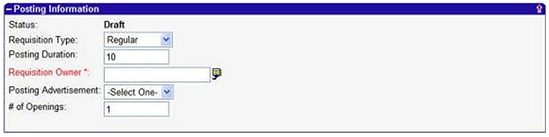
- The following fields default based on the position selection in the Posting tab:
- Status - Defaults to Draft when creating a new requisition
- Requisition Type
- Posting Duration
- Requisition Owner - Defaults to the manager creating the requisition
- # of Openings - Defaults to 1
- Under the Posting Information section you select the Requisition Type as either Regular or Perpetual from the drop down. A Regular requisition has a posting duration of 10 days. The Service Center contacts you to extend the advertising date for a regular requisition. A Perpetual requisition has a posting duration of 182 days (6 months). If you select a perpetual requisition, you receive a message upon saving the requisition that you need to coordinate with the Service Center. The Service Center also contacts you to re-initiate a perpetual requisition.

Helpful Hint: If the position does not qualify for telecommuting, leave the Telecommuting Status field value as Select One.
- You can cut and paste information from job descriptions you have on your computer into this section. The job description that you enter in the Job Description field is displayed on the job posting and is viewable to all applicants.
- Please remember to check the spelling on the Job Description as it will display to all applicants

- Position Title
- Functional Title
- Supervisory Level
- Requisition Owner
- Job Description
- Posting Salary From -To
- Notice that the requisition is now called a Profile. Once the requisition is either routed for approval or saved as a draft, it is no longer called a Requisition but a Profile. You have the option to copy and/or edit the profile on this page. If you would like to copy a profile to create a new requisition, select Copy Profile from the right Menu navigation bar. If you would like to edit your profile, select Edit Profile from the right Menu navigation bar. You can still edit the requisition while it is in Draft status.
- You have the ability to choose assessment questions and interview questions to associate with the requisition. You can add an assessment or interview questions to a draft requisition. You cannot add interview questions to requisitions that have been approved.
- Please note that at this point, the requisition appears in Draft status on the My Requisitions section on the Workbench.
 highlights the Add Assessment link." width="549" height="57" />
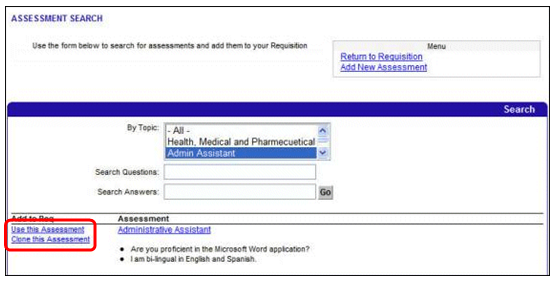
Helpful Hint: If you select Clone this Assessment, you can include additional questions that can help you sort your applicants. For example, for an Administrative Assistant position you may feel that it is critical that the applicant know how to use Microsoft Word. You can select Add a Question to this Assessment to add the question “Do you have experience using Microsoft Word?” You can also weight the question. By weighting the question, applicants who respond “Yes” to the question (if Yes is the correct response) will be sorted to the top of the applicant list. Questions that are more important should receive a higher weight.
Helpful Hint: These questions are used to sort the applicants. Applicants are sorted based on the question weight that you assign to each question. If your requisition is for a hard to fill position, it is recommended that you do not add an assessment and review all the applicants.
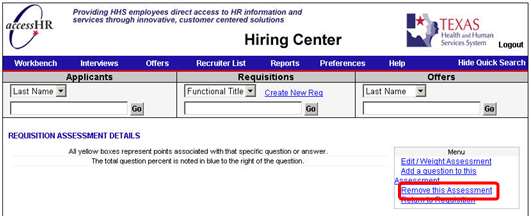
 highlights the Add/Edit Question and Print Question links." width="555" height="69" />
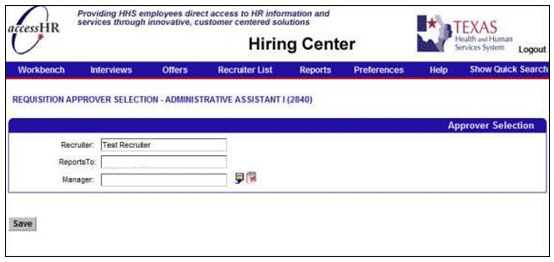
Helpful Hint: The CAPPS Service Center defaults into the Recruiter field as your level one approver and the Reports To field defaults to your manager. You may also choose an additional approver.
Helpful Hints:
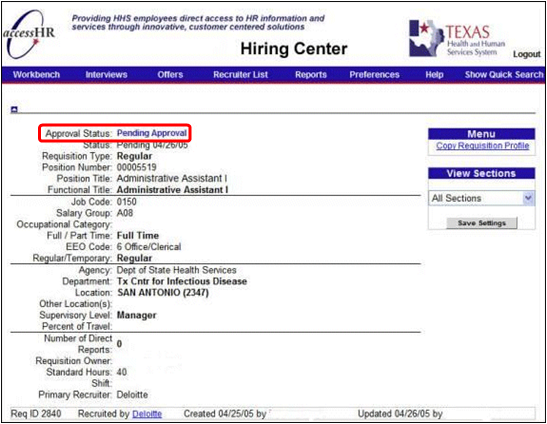
- Notice that the requisition is now called a Profile. Once the requisition is either routed for approval or saved as a draft, it is no longer called a Requisition but a Profile. You are no longer able to edit the requisition profile once you have routed the requisition for approval, however, you do have the option to copy the Profile by selecting Copy Profile from the right Menu navigation bar.
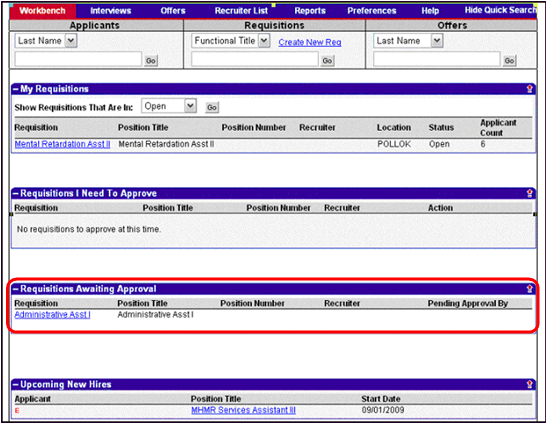
- Notice that once the requisition is routed for approval, it appears on the Workbench page under the Requisitions Awaiting Approval section. The requisition details display the requisition, the CAPPS Service Center Specialist associated with the requisition, and which approver is currently reviewing the requisition.
- Once you have routed the requisition for approval, the Staffing Specialist contacts you to review your requisition form.
_ Reviewing Applicants
Accessibility Instructions
Use your screen reader commands to navigate the elements on the page such as headings and links.
Introduction
The complete requisition profile contains a summary of all of the requisition information as well as the ability to add additional information required for the staffing process. Once the requisition is approved, the requisition profile is updated to reflect the approved status. The profile is posted so that applicants can view the posting and apply to the position.
Step Actions
The step actions for completing a transaction are presented in two ways: Text Only and Screen Samples:
- Text Only provides instructions for completing the transaction in order from beginning to end. It does not include screen samples.
- Screen Samples include detailed screen shots to help complete the transaction.
Key Terms
Text Only Step Actions for Tracking an Application Status
Follow the steps below to track an application status.
Steps
Navigate to the Workbench tab under My Requisitions to track the status of applications to your requisitions. The number under the Applicant Count column indicates how many applicants are attached to (or have applied to) your requisition.
- Applicants
- Requisition Approvals
- Descriptions
- Interview Team
- Compensation
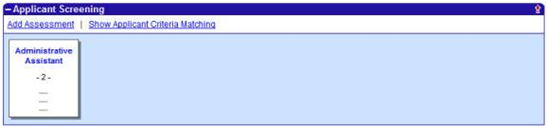
- Applicant Screening
- Interview Questions
- Due Diligence Checklist
- Expenses
- Requisition History
- Requisition Details, Requisition Approvals, Descriptions, Recommended Compensation, Due Diligence Checklist and Requisition History are informational and provide you with information about the requisition. You do not make entries in these sections.
- Applicants, Interview Team, Applicant Screening, Interview Questions and Expenses are all used in the process of reviewing and hiring applicants.
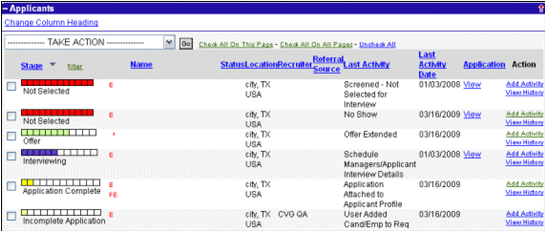
To start reviewing applicants and tracking the hiring process, scroll down the requisition profile to the Applicants section.
Helpful Hints:
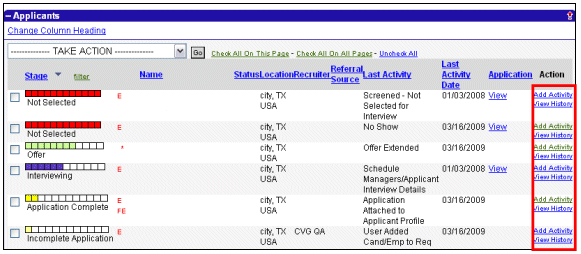
- The Applicant section of the requisition is updated with the names of applicants who have applied to the specific requisition and tracks the applicant’s status as the applicant moves through the recruitment process. As the applicant moves through the recruitment process, the bar below the Stage column updates to the stage of the process the applicant is in. Each stage has a color associated with it and the bar begins to fill up as the applicant moves through the process.
- If there are applicants attached to your requisition, you can perform a concept search. Select Click here to search within these Applicants to search applicants attached to your requisition. You only see this link if there are applicants attached to your requisition.
- Once you select Click here to search within these Applicants, a new page appears where the position description is pre-populated in the search field. Review the job description and then click the Search button. Clicking Search compares the job description and conceptually matches it to applications of the applicants on this requisition. This search returns a results page which sorts the applicants according to the match.
- The fields which are returned can be changed by clicking on Change Column Heading. Select Change Column Heading to choose which column headings to display in the Applicants section.
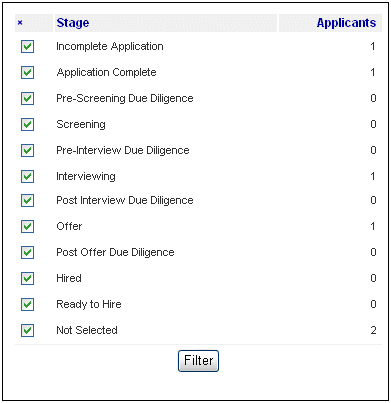
- Incomplete Application
- Application Complete
- Pre-Screening Due Diligence
- Screening
- Pre-Interview Due Diligence
- Interviewing
- Post Interview Due Diligence
- Offer
- Post Offer Due Diligence
- Hired
- Ready to Hire
- Not Selected
- Applicant Details
- Req History
- Activities
- Additional Information
- References
- Due Diligence Checklist
- Candidate Expense
- Resume
- Summary
- Questionnaires
- Applicant Details, Additional Information, Resume, and Summary are informational and provide you with information about the applicant. You do not make entries in these sections.
- Req History, Activities, References, Due Diligence Checklist, Candidate Expense, and Questionnaires are all used in the process of reviewing and hiring applicants.
- There are visual indicators under Name. An applicant can have multiple visual indicators next to the applicant’s name. The following lists a description for each visual indicator.
- E indicates Employee
- FE indicates Former Employee
- RIF indicates RIF Applicant
- V indicates Veteran
- VO indicates Veteran Orphan
- VS indicates Veteran Spouse
- Asterisk (*) indicates Felony
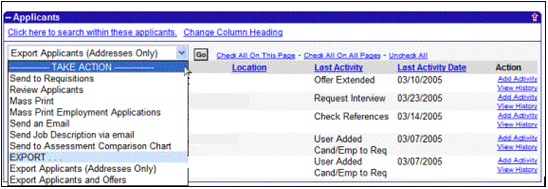
- Various actions can be initiated by you for each of the applicants attached to your requisition:
- Send to Requisitions
- Review Applicants
- Mass Print
- Mass Print Employment Applications
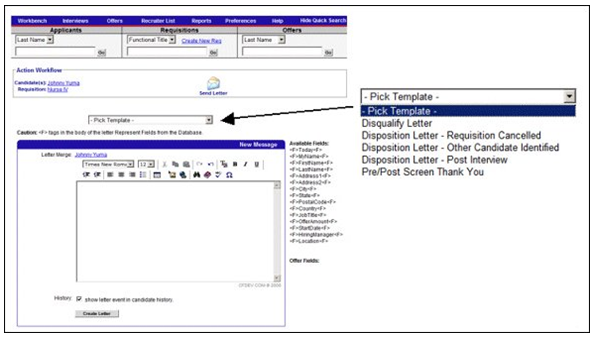
- Send an Email
- Send Job Description via email
- Send to Assessment Comparison Chart
- Export Applicants (Addresses Only)
- Export Applicants and Offers
Helpful Hints:
- Check All on This Page � To take action on all the applicants who are displayed in the Applicants tab, select Check All on This Page. You then select the action you want to take from the drop-down menu and click the Go button.
- Check All on All Pages � To take action on all or a majority of the applicants attached to your requisition, select Check All on All Pages. This selects all the applicants attached to your requisition. If necessary, you can deselect those applicants who you do not want to take action against by clicking the check box on the left side in the applicant’s row. You then select the action you want to take from the dropdown menu and click the Go button.
- Uncheck All � To deselect all the applicants that you have previously selected, select Uncheck All.
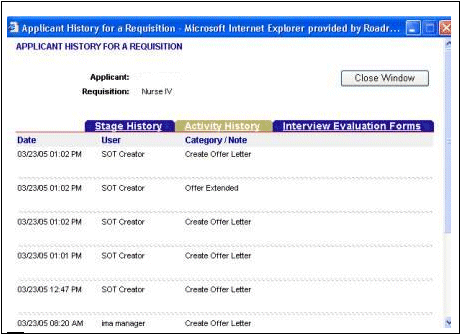
Helpful Hints:
- Please note that different activities display based on what stage the applicant is in.
- Possible activities are: (Activities listed in red are required and you are not able to progress to the next stage without adding them.)
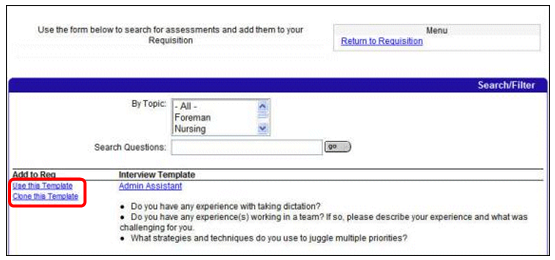
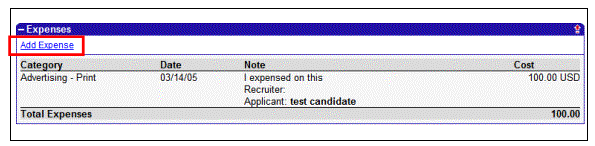 highlights the Add Expense link." width="595" height="146" />